Pages

Showing posts with label gift. Show all posts

Sunday, July 8, 2012

Wedding Bag

A wedding. The joining of two great things...paper and adhesive...I mean...a loving man and woman. It's been awhile since I've gone to a wedding and when we received the invite I was ready to break out the craft supplies! All I needed....an inspiration. So where would I go but Pinterest.

I can always count on Pinterest to get the old creative juices flowing. Perusing late one night, I came across a really great "Card Organizer" made of cardboard, cardstock, and ribbon. I'm totally "scrap-lifting" that ran through my head faster than a 10-year old on a soapy slip-and-slide. As with all my projects, I needed to let the ideas swirl around in my head for a bit. 

Complete Project at: http://becreativewithamy.wordpress.com/2009/12/21/card-organiser-tutorial/
The color palette I decided on was black and white. Classic right? Elegant? Regal? All things worthy of a wedding motif. I have to give tons of credit to Hubbs. I drug him to the craft store to find "the perfect black and white wedding paper." Easy? Um, NO! The only black and white wedding paper was text laden. Not exactly the feel I was going for. All of a sudden, it was like I was in the toothpaste aisle..."All I want is toothpaste!" I was moving so fast from paper to paper (remember Hubbs? Well, he's an in-and-out-with-what-we-need kind of shopper...time would run out soon!). Just as I was ready to throw in the towel, Hubbs carefully slides a Stack-Pack of black and white paper in my line of sight and says, "This may not be what you're looking for, but it has black and white paper. It's not wedding but I thought I'd show you." Don't you love his approach...this may not be what you're looking for...genius I tell you! At that very moment, the clouds parted, sun streamed through the windows and he was encircled in light....my Savior! Do you think he knows how often he'll be going to the craft store with me from now on?

The paper he found was just right. I love that many of the pages have a velvety texture. How perfect is that for a wedding? That's what I thought. Now the real fun began...

Isn't it pretty? (Don't mind the creativity covering the table in the background. ;) )
Since I had not made this particular bag before, I decided to follow instructions for cuts, scores, everything, as written. The result? Not too shabby although I did find places where pieces just didn't fit the way I wanted them to and made slight adjustments.

The text laden wedding paper made a perfect liner for the inside of the bag body.
Accordion side secured with beautiful ribbon.
A few embellishment pearls and plaque and it's done! 

Sunday, January 15, 2012

Survival Kit 101

We've all had those times in our life when we come to realize the power and truth in the statement, "That which does not kill us makes us stronger." Most of us learn from these experiences and never want to repeat them, then, there are gluttons for punishment, like myself, who go back time and time again to see if it is true EVERY time. ;) My very dear Friend has just started nursing school and I wanted to do a little something to keep her spirits up as she learns just how strong she is.

When I started the Teaching Program, I was given a "Survival Kit." I knew this was exactly the type of thing I wanted to create for my Friend. So, I set off to brainstorm and get my bearings for the project. I don't know about you, but I do about 98% of project planning in my head, which makes putting together the project a "love/hate" type of experience. I knew I wanted to house the Survival Kit in a paper container that looked like a retro medical bag. First goal, figure out how to create a 3D medical bag out of paper. I scoured all my Cricut cartridges and found a 2D image but nothing 3D. I was beginning to regret not purchasing the Tags, Bags, and Boxes cartridge when I had the chance but knew that line of thinking would only derail my project. One night, the Fam and I went to the store and I decided I would just take a look at the craft supplies. Low and behold, they had the Cricut Sweet Tooth Boxes cartridge. I looked at the images and found this beauty.

Toolbox aka future medical bag
I swooped up the cartridge and rushed home to make a prototype. Bad pic, mediocre prototype at best but now I knew where I was going. I made the bag out of cardstock but it was still a bit too weak...when I put items in the bag, the bottom gave way. It's kind of boring just white with the traditional red so I knew I'd need to spruce it up.

If you use a Cricut machine, I highly recommend getting Cricut Design Studio Software. It is a lifesaver to me. I bought the software right after Hubbs gave me an Expression and it made using my machine so much simpler. On the screen, I am able to layout all the images I want to cut and can save entire projects for later. Take a look:
I love being able to see what will cut before hitting the button.
Just what I pictured! I used the "weld" function to create words instead of individual letters.

Design Studio lets you add pages to your project, allowing you to put all the cuts in one file. Love, love, love this feature! Here are the final cuts. 


Now, assembly! First, I put the decorative nurse patterned paper on the cardstock cut that will be the top of the bag and then finished putting the top together. 


Covered wagon? No, it's a lid!

Handle and "lock" attached.


Assembly is quite simple. There are tabs, scores, small holes, etc to help make this process as painless as possible. By making a prototype, I was able to figure out which order was best for putting the pieces together. So far, it's turning out great. Next, I put together the bottom half, the "box" and attached the lid. 


Lid is attached.

Back
Once the box/bag was assembled, it was time to adhere the words.

Loving it!

Still needs to be reinforced.
 I dug through my cardstock stash and found a great, complimenting color, sturdy cardstock. When I made these cuts, I decreased the size by 1/8" to ensure it would fit inside the existing box bottom.

Ready to reinforce.

Perfect fit!
With the box ready, it's time to fill it up! 


Much more sturdy and ready for goodies.
 My girls and I had a great time coming up with things to fill this kit with. The box if full of little things that I hope will bring a smile to Friend's face...if not, she can use the Smile-on-a-Stick. :) We included a letter describing the reasoning behind all of our choices.
Hmmm....what all is in there?

So many little goodies...
I'm sure you're wondering what exactly is in there and why. Here's what I wrote to Friend: 


Nursing School Survival Kit

I put together a little something to help you make it through the next few years. Allow me to explain…

·      Lifesavers, use them as a life preserver when you feel like you're going down but also remember, they are a symbol for what you will do time and time again.
·      The paperclip is to help you keep things together when it feels like they're going out of control.
·      This piece of string is for tying a knot in the end and hanging on when you're at the end of your rope.
·      The Band Aid protects those little hurts along the way, plus, sometimes, they just make you feel better.
·      A Tootsie Pop, to remind that you’ll lick your problems and enjoy the reward at the end.
·      A button- Just a friendly reminder to button up and listen, especially to upset family members, they just want to be heard.
·      Tissues-To dry your tears of joy, sorrow, and frustration
·      Gum- remember, just stick to it!
·      A license to ask a lot of questions…this is all for you, ask away Friend!
·      Hole punch—for when you want to PUNCH something!!!
·      Smile-on-a-stick—for those times when it’s the one you can put on.

I love you Friend and know you will be phenomenally successful in your endeavors; may you never lose sight of your goals. I’ll see you at the finish line!     ~Jeanette

We gave her the Survival Kit last night and she loved it!

Saturday, December 31, 2011

Potter's Hours

My mom is an amazingly talented artist. Her passion? Pottery. Over the past few months, she and my stepdad have been building a pottery studio on their property where a wood "shed" once stood. It has been an amazing transformation! The studio opening was held on December 18, 2011. I knew I wanted to make something for the studio for my mom's gift this year. But what should it be? Then, I was inspired. An "Hours" sign! Perfect!

SAVI Clayworks

As with my other projects, once I have an inspiration, I put my imagination to work to implement. Here's the story of "Potter's Hours."

Inspiration:
"Potter's Hours: When Creativity Strikes"

Imagination:
Getting my imagination going needed little more than a walk around the craft store. I knew what I wanted to make, a sign or plaque with a saying. Ideally, it would hang underneath the porch light....outside. Could I make that happen?

Implementation:
Wandering through the craft store, thinking and looking, I'm hit with it! A piece of wood, nice paper, an embellishment or two, paint and sealer. I perused the wood pieces and found a great size and shape. Next up was looking at paint. I found a set of 16 outdoor paints. In the scrapbook section, I found a set of 3 adorable key embellishments that I just "had" to use and a beautiful decorative paper. So, with my arms loaded up I headed to the check-out.

Once I got home, it was time to prep the board. A little bit of sanding the rough spots, wiping clean, primer, spray paint and a few hours, this was what I was looking at.
Ready!
Remember that set of outdoor paints I bought? Well, they turned out to be a great return item! I ended up using an antique bronze color spray paint I had left over from another project. The color is just perfect...you'll see. :)


So, I have this great start...what next?! Yikes!! While I let my imagination work, I set to cutting out the saying using my Cricut.
The letters turned out just like I pictured. 

That was enough time for my brain to work its magic and I knew what to do next. I wanted to add the beautiful decorative paper to the plaque but didn't know if I wanted the entire surface covered. So, where better to start than covering the entire piece right? I didn't want any straight finished edges on the paper though but I knew just tearing the paper would run the risk of damaging the paper. Okay, maybe it has less control than I like, who knows. ;) To get the effect I wanted, I placed the decorative paper over top the plaque. Then, I smoothed down the edges around the entire thing, just like in the picture but with the deco paper.

I later use this paper for another purpose.
Then, I made sure to crease the edges of the plaque shape really well. Very carefully, I ran the creased edges under a small stream of water to moisten the crease just enough. I used the crease and water to help make a "controlled" tear of the paper. Here is the result.

The deco paper fits perfectly and so easy to make happen!

See the tattered, yet controlled, edges? ;)
Okay, so now I have this piece of paper...do I want to cover the entire surface? It'll cover up the amazing paint color if I do and I'm not sure how well all that paper will hold up outside. So I started experimenting. Remember those little key embellishments? They are perfect when paired with the deco paper. So, what if the deco paper is an accent.....like an edge. Hmmm.....let me start playing with that idea. This is where the piece of plain, printer paper came in handy. I creased it in the same way and then tried laying out the design to see if it would work. (The more crafting I do, the more I realize how valuable taking your time, planning, measuring and thinking really do help!)

We're getting there...

Using a scrap of the deco paper...not liking the angles at the top and bottom....

The keys are just perfect!

Checking that the letters do in fact fit on the plaque and experimenting with placement.
The experimenting paid off. I knew right away that I did not like the angles at the top and bottom of the deco paper so they would have to go. It looks too "new" so some distressing will be needed (on the letters too). 

A little distressing and adjusting and we're ready!
Before I glue the paper and hang the keys, I sanded the edges to distress the plaque just a bit.

Sanding

Just the right effect
I wanted to ensure the deco paper would stay put so I enlisted the help of my trusted, super sticky tape. You know, the"red" stuff? I lined the edges and put a strip down the center then on the plaque it went.

The "red" stuff


Perfect!
Mod Podge was the next step. I like the ease of adjusting placement it allowed when placing the saying on the plaque. After it dried, I applied ump-teen-million more coats and used a spray paint sealer as the final layer.

Dry faster! :)
So...it appears I've done it again....wrapped it up and given the gift without taking final pictures. "Shoot!" I'll be back......

Christmas Gift Tags

To say I've been bitten by the creative bug this holiday season might be an understatement. I blame it on my amazing neighbor who encourages me to use my creative side. The fire was reignited with a card making workshop we went to together. At the workshop, we made a set of 6 gift tags. Well, 6 gift tags just isn't enough, we all know that! So, I had to make more...as soon as I got home, of course! For this project, I enlisted the help of my Cricut Expression and my daughters.

While I cut lots of ovals in two different sizes and colors, they used the Christmas stamps we have and colored the images with Zig markers. Once the ovals were cut, I glued them together and used distress ink in Walnut on the edges. I also stamped "To: From:" on the tags. The girls finished coloring the images and cut them out, leaving a small white border. We used 3D-adhesive dots to make the images "pop" and add dimension to the tags.

Aren't they cute?!

We saved as many as we could for next year too! 


And lastly, I tied a piece of red raffia through the hole on each tag. I LOVE these and LOVE that my girls made them with me.

Glass Block

This year, I just wasn't feeling the consumer side of Christmas so I decided to go in the homemade, handmade direction. I truly hope those who received the products of my "rebellion" enjoy them as much as I enjoyed making them. Making gifts is great but waiting to share the projects until after the recipient got the gift was hard!

Here goes!

I've fallen in love with glass block projects. Last year (2010), I made my first one for a family friend of my parents, who would be taking the gift back to Finland. For his project, I had to circumvent some challenges like weight, fragility and not knowing a ton about his personal interests.  The local craft store had smaller size glass blocks...4 inches if I remember correctly. So, I started in with a small project. The friend is a pastor so I chose a simple sentiment "Faith" with a small flourish. To color the glass block, I used alcohol ink. It was my first time using it and I loved the result! A little definitely goes a long way! (...It appears I do not have a picture of this particular glass block. If I find one, I'll add it.)

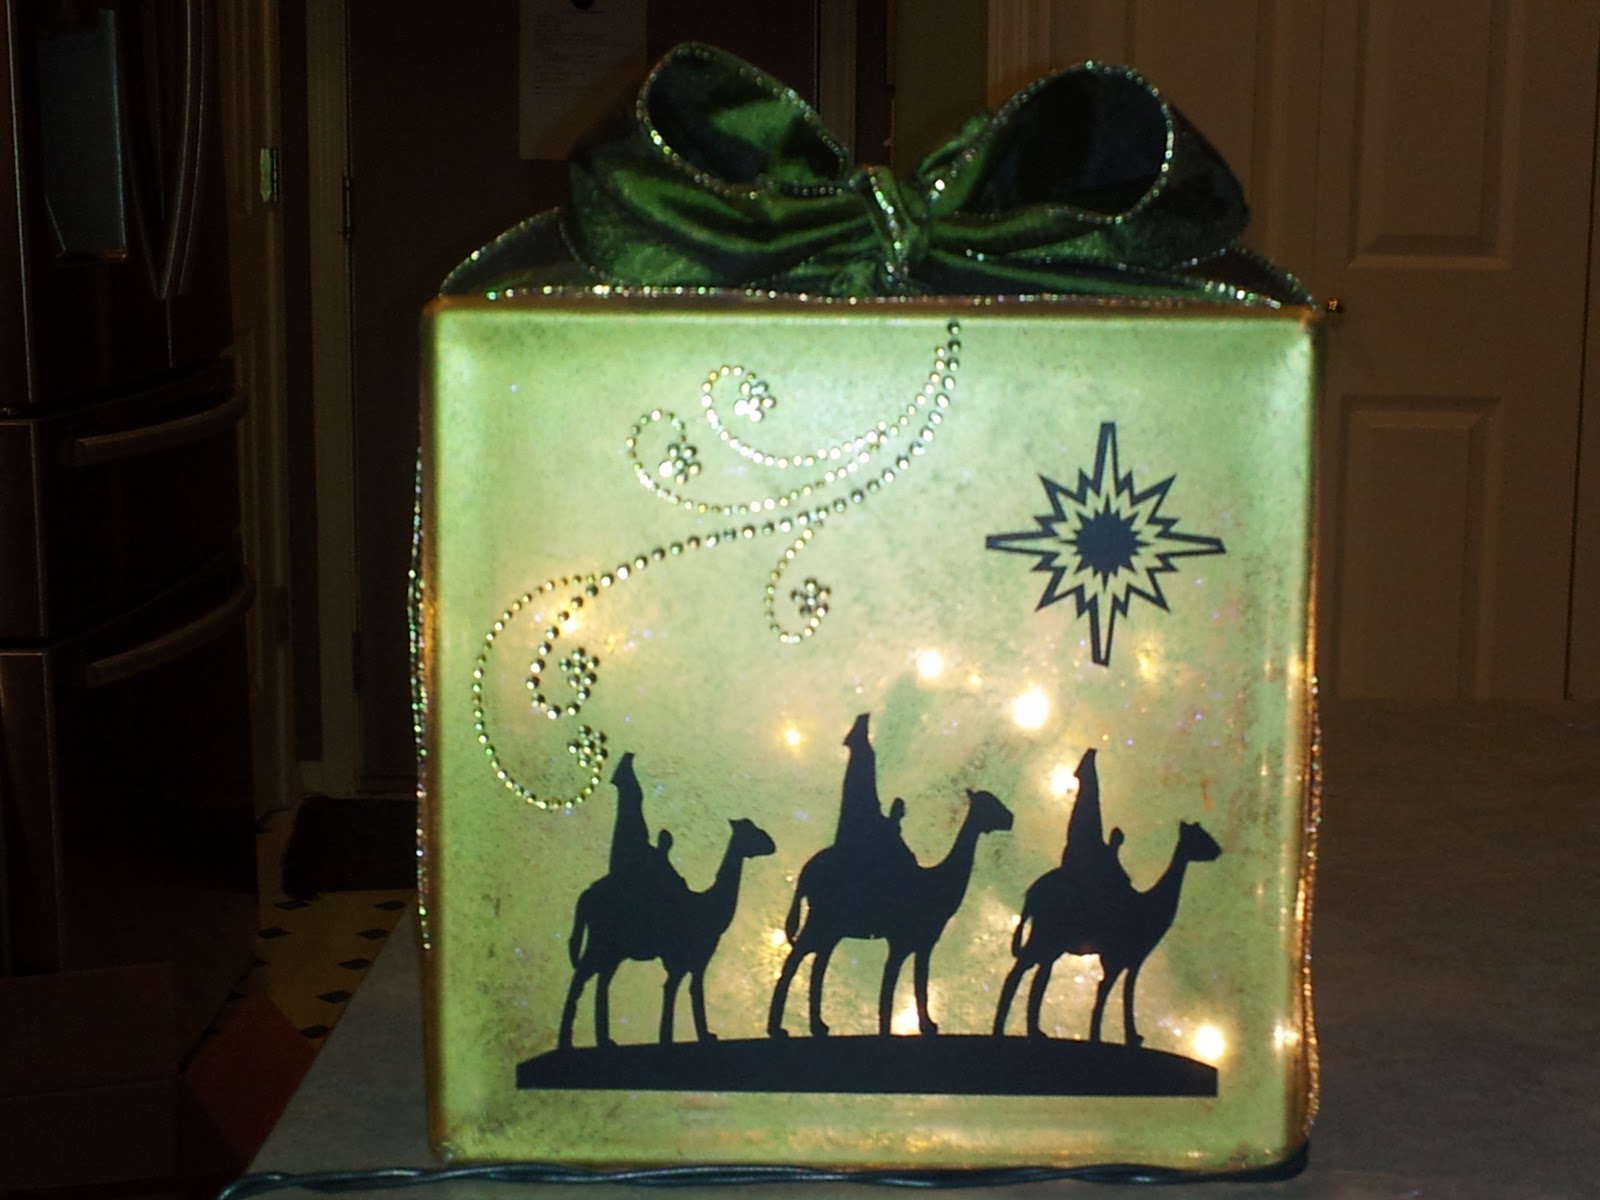
This year, I decided to make a religious themed glass block for my Mother-in-Law. One of my favorite things to do is think ahead and purchase seasonal items at the end of the season, on clearance, for the next year. That's exactly what I did. At the end of the holiday season 2010, I purchased 2 vinyl transfer decals just for this project at a fraction of their retail price. Then, I waited for the other items to go on sale and finally got to put it all together around Thanksgiving time this year.

Front

I didn't take pictures throughout the process, just at the end. So, I'll do my best to recount the steps I took.  I LOVE how it turned out! First, I cleaned the glass block. Then, I used Adirondack Alcohol Ink in Gold and applied it in a circular, overlapping motion. It took two coats to get the desired hue. The ink dries quickly so work in small areas then move on. I made sure to ink the sides too as they are partially visible under the ribbon.

Next, I applied the vinyl transfer images. One to the front and one on the back. Once that was done, I added the bling embellishments. The bottom of the block has an opening with a plastic plug. This is where I inserted the string of 20 white lights and iridescent "Easter grass" to fill the interior of the block. Finally, I glued a length of ribbon that went from about 1/4 of the way from the left to a 1/4 of the way to the right side of the block. This allows the entire glass block side to be covered in ribbon even under the bow where the ribbon squishes together. The last step was to wrap the entire block with the ribbon and tie an elegant bow.

Back

I love how it turned out but best of all, my Mother-in-Law loves it!